Refinishing A coffee table can breathe new life into your living space while showcasing your creativity And DIY skills. Whether you want To restore A beloved piece Or transform A thrift store find into A stunning focal Point, This guide will take you through the step-by-step process Of refinishing A coffee desk. From prepping The surface To choosing The perfect finish, You’ll discover everything you need to know To give your coffee desk A fresh And stylish makeover. So, Roll up your Sleeves, Grab your tools, And let’s begin The journey of revitalising your coffee desk And elevating your home decor.
Is refinishing a coffee table difficult?
Refinishing A coffee table’s difficulty can vary based on your experience And The table’s condition. It’s A manageable DIY project for many, But complexity can increase with intricate designs Or severe damage.
1. Gather Your Materials:
Before embarking on your coffee desk refinishing Project, It’s crucial To gather all The necessary materials. This preparation ensures A smooth And efficient process. Start by collecting essentials like sandpaper, Paint or Stain, Brushes, Safety gear (gloves, Goggles, Mask),And a well-ventilated workspace. Additionally, Have cleaning supplies on hand for surface preparation And any other tools specific to your chosen refinishing method. Properly equipping yourself from The beginning will help you tackle The project with confidence And achieve The best results.
2. Assess Your Coffee Table:
Assessing your coffee table is A crucial first step in The refinishing process. Take The time To closely examine its current condition. Check for any Damage, Such as scratches, Dents, Or watermarks, And note The type of existing finish, If any. This evaluation will guide your refinishing Decisions, Helping you determine whether you need To repair or replace any Parts, Whether stripping The existing finish Is Necessary, And which refinishing method is most suitable. By thoroughly assessing your coffee desk, You’ll have A clear roadmap for The rest of the Project, EnsuringA successful And satisfying transformation.
3. Plan Your Design:
Planning your design is A creative And essential step in refinishing your coffee desk. Consider The overall look you want To achieve and The style that suits your space. Decide on The finish—whether you want To emphasise The natural wood grain through staining or opt for A solid colour with paint. Explore various colour options And finishes to align with your home decor. This thoughtful planning stage allows you To visualise The final result And ensures that your refinished coffee desk seamlessly integrates with your interior design Scheme,Creating A harmonious And aesthetically pleasing space.
4. Preparing the Workspace:
Preparing The workspace is A vital aspect of refinishing A coffee desk. Begin by choosing A well-ventilated Area, preferably outdoors or in Garage, To minimise exposure To fumes And dust. Cover The floor And nearby surfaces with drop cloths Or newspapers To protect them from spills And stains. Organise your tools And materials within easy reach To maintain an efficient workflow. Safety should be A top Priority, So make sure you have adequate ventilation And wear appropriate safety Gear, Including Gloves, Goggles, And A mask. By setting up A clean, Organized, And safe workspace, You’ll create The ideal environment for A successful coffee table refinishing project.
5. Stripping the Existing Finish:
Stripping The existing finish is A critical step in The coffee desk refinishing Process,Especially if The old finish is damaged Or uneven. To begin, Apply A suitable paint or finish stripper to The table’s Surface, Following The manufacturer’s instructions carefully. This chemical or gel will break down The existing finish, Making it easier To remove. After The recommended dwell time, Gently scrape away The softened finish with A putty knife Or paint scraper. Ensure you work in a well-ventilated area, wear protective gear, And dispose of The removed finish properly. Stripping The desk’s old finish prepares The surface for A fresh start And is essential for achieving A smooth And uniform result.
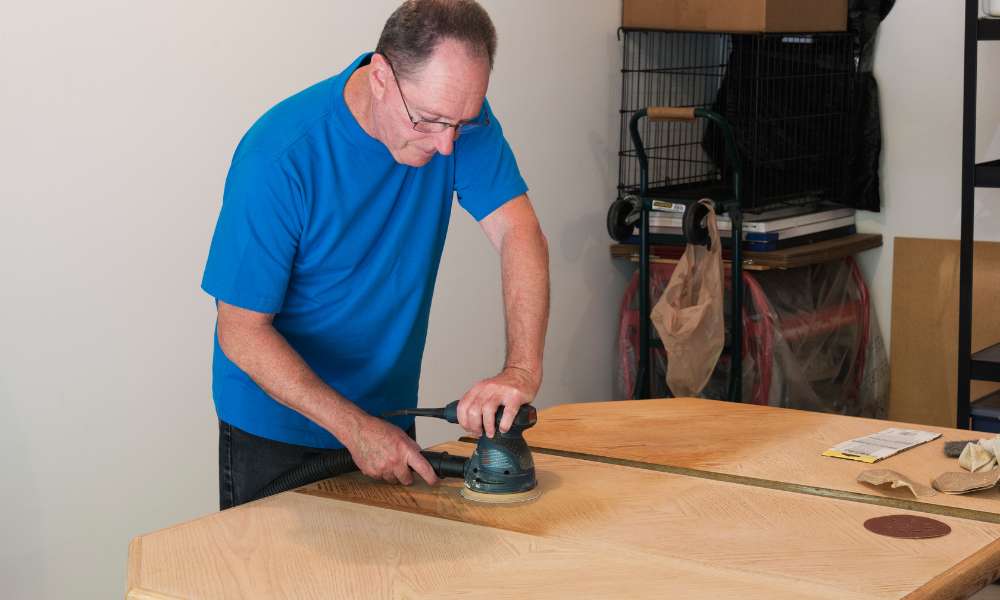
6. Sanding and Smoothing:
Sanding And smoothing The coffee desk’s surface is A crucial step in refinishing that enhances The final result. Start with coarse-grit sandpaper To remove any remaining finish Or imperfections. Gradually progress To finer-grit sandpaper To achieve A smooth And even surface. Pay close attention To corners, Edges, And intricate Details, ensuring uniformity throughout. The goal is To create A clean canvas for your chosen finish—whether staining Or painting—so The wood absorbs it evenly. Proper sanding is The key To achieving A professional-looking And polished outcome for your refinished coffee desk.
7. Staining or Painting:
When it comes To refinishing your coffee Table, The choice between staining And painting is pivotal. Staining allows you To enhance The natural beauty of The wood, emphasising its grain And texture while adding colour. On The other hand, Painting provides A wider range Of colour options and allows you To achieve a Solid, Uniform appearance. Your decision should align with your design vision and The overall aesthetic of your space. Whichever option you choose, Follow The specific techniques And instructions for staining Or painting To achieve The desired look, And don’t forget to apply A protective finish afterward To seal in The new finish And ensure longevity.
8. Applying a Protective Finish:
Applying A protective finish is The final crucial step in refinishing your coffee desk. This protective layer not only enhances The appearance but also safeguards The new finish from wear And tear. Depending on your Preference, You can choose from various protective finishes like Polyurethane,Varnish, Or wax. Each has its unique Advantages, Whether it’s Durability, A glossy finish, Or A Softer, More natural look. Follow The manufacturer’s instructions To apply The chosen finish Evenly, And allow it To dry thoroughly. This protective coat ensures The longevity Of your refinished coffee desk while adding A final touch of lustre To your project.
9. Reassembling and Hardware:
Reassembling your coffee table And ensuring all hardware is properly placed is The penultimate step in The refinishing process. Carefully reattach any components such as Legs, Drawers, Or knobs that you may have removed during The project. Ensure that everything fits securely And functions as It should. This step ensures not only The structural integrity of your coffee desk but also its functionality. Properly reassembling And checking The hardware ensures that your refinished coffee desk Is not only beautiful but also fully ready To serve its purpose in your living space.
10. Styling Your Refinished Coffee Table:
Styling your refinished coffee table is The final creative touch To your project. Consider the overall aesthetic Of your space And choose decor items that complement your table’s new look. Items like decorative Trays, Books, Candles, Or a vase with fresh flowers can add personality And charm To the desk. Keep in mind The balance between function And Aesthetics, Ensuring that The styled coffee desk enhances The overall ambiance of your living area. This stage allows you To personalise your space And showcase your refined coffee desk as The centrepiece of your room.
11. Troubleshooting Common Issues:
Troubleshooting common issues is an essential skill during The coffee desk refinishing process. If you encounter problems like streaky finishes, Uneven Staining, Or bubbles in The protective Coat, Don’t panic. Most issues can be addressed with some patience And corrective measures. For streaks or uneven Finishes, Light sanding And additional coats can often even things out. If bubbles appear in The protective Coat, Lightly sand The affected area, Apply A new coat, And work in A dust-free environment To prevent further issues. Effective troubleshooting ensures that your refinished coffee desk meets your expectations And looks its best.
12. Maintenance and Care:
Maintenance And care are essential To prolong the life And beauty Of your refinished coffee desk. Regularly dust The surface To prevent buildup, And use coasters Or placemats To protect against spills And scratches. Be prompt in cleaning any spills To prevent stains. Periodically inspect The protective finish for Wear, And reapply it as needed To maintain its lustre And protection. By adopting these simple maintenance Practices, You can ensure that your refinished coffee desk continues To shine as A centrepiece in your living space for years To come.
Can I refinish a coffee table with veneer?
Yes, You can refinish A coffee desk with Veneer, But it requires extra care. Be cautious not To sand through The thin veneer layer while sanding And take care when applying finishes To avoid bubbling Or lifting.
How can I maintain my refinished coffee table?
To maintain your refinished coffee Table, Regularly dust It, Clean spills promptly, Use coasters And placemats To prevent Damage, And reapply a protective finish as needed To maintain its appearance And durability.
Conclusion:
In concluding your coffee table refinishing Journey, You’ve not only breathed new life into A piece Of furniture but also unleash your inner DIY enthusiast. With careful Planning, Dedication, And a touch of Creativity, You’ve transformed A tired coffee desk into A stunning centrepiece That perfectly complements your living space. Remember That refinishing is not just about aesthetics; It’s A testament To your ability To bring beauty And functionality to The things you cherish. So, As you enjoy your newly refurbished coffee Table,Take pride in your Craftsmanship, And perhaps consider your next exciting DIY project To further enhance your home.