
Unlocking the potential of your KitchenAid mixer with the meats grinders attachment opens up a world of culinary possibilities right in your own kitchen. Whether you’re a seasoned chef or a novice cook, Mastering the art of using this versatile attachment can revolutionize the way you prepare meats-based dishes. From homemade sausages to perfectly ground beef for burgers, The KitchenAid meats grinder attachment offers convenience And Control over your ingredients like never before. In this guide, We’ll walk you through the step-by-step process of assembling, Using, And Cleaning your meats grinder attachment, Ensuring that you can achieve professional-grade results with ease. Let’s dive in And Explore the endless culinary adventures awaiting you with your KitchenAid meats grinder attachment.
Familiarizing With The Attachment
Before diving into the process of using the KitchenAid meats grinder attachment, It’s essential to become acquainted with its components. The attachment typically consists of a grinding plate, A grinding worm (also known as an auger), A blade, A food pusher, And A housing unit that attaches to the front of your KitchenAid mixer. Familiarize yourself with each part And How they fit together by referring to the user manual provided by KitchenAid. Understanding the assembly process ensures that you can set up the attachment correctly every time, minimizing the risk of errors or malfunctions during use. Take the time to inspect each component for any signs of damage or wear And Tear, And Ensure that they are clean And Dry before assembly to maintain optimal performance.
Choosing The Right Meat
Selecting the right type of meat is crucial for achieving the desired texture And Flavor when using the KitchenAid meats grinder attachment. While the attachment is capable of grinding various types of meats, Some options work better than others. For instance, Lean cuts of beef, Such as chuck or sirloin, Are ideal for making ground beef for burgers or meatballs, As they offer a good balance of fat And Flavor. Similarly, Pork shoulder or butt is excellent for making homemade sausages due to its higher fat content, Which contributes to a juicy And flavorful end product. Consider your recipe requirements And Personal preferences when choosing the meats, And Always opt for fresh, High-quality cuts for the best results. Additionally, Ensure that the meats are well-chilled before grinding to prevent them from becoming mushy or difficult to handle.
Selecting The Type Of Meat To Grind
When using the Kitchenaid meat grinders attachment, Choosing the right type of meat is essential for a successful grinding process And delicious results. Opt for cuts that offer a good balance of fat content And Lean meats to achieve the desired flavor And texture in your ground meats. Cuts such as chuck roast, Sirloin steak, or pork shoulder are excellent choices as they provide a rich flavor profile And Juiciness that will enhance your recipes. Consider mixing different types of meats for unique flavor combinations or experiment with seasonings to add depth to your ground meat dishes.
Ensuring The Meat Is Properly Chilled
Properly chilling the meat before grinding is crucial to maintaining food safety standards And Achieve optimal results with your Kitchenaid meat grinders attachment. Cold meat is easier to handle during the grinding process And Helps maintain its texture And Flavor integrity. Before beginning the grinding process, Ensure that your meats are thoroughly chilled but not frozen. Place the meat in the refrigerator for a sufficient amount of time to reach an ideal temperature, Typically around 32-35°F (0-2°C), Ensuring that it stays safe from bacteria growth while being ground.
Trimming Excess Fat And Connective Tissue
Before feeding the meat into the grinder, It’s important to trim excess fat And Tough connective tissue from the cuts you have selected. Removing excessive fat ensures that your ground meat maintains a good balance of flavors without becoming overly greasy. Trim any tough connective tissues as they can clog the grinder or result in unpleasant chewy bits in your ground meat. By taking the time to properly trim the meats before grinding, You’ll not only achieve a better-textured end product but also prolong the life of your Kitchenaid attachment by reducing strain on its components caused by tough gristle or sinew.
Preparing The Meat
Before using your KitchenAid meat grinder attachment, Proper preparation of the meat is essential for the best results. Start by selecting fresh cuts of meat that are well-marbled for optimal flavor And Texture. Cut the meats into smaller chunks or strips that will easily feed into the grinder chute. For added versatility, Consider mixing different meats or adding seasonings at this stage to create custom blends. Additionally, Make sure to remove any bones or tough cartilage that could damage the grinder during the process.
Setting Up The Grinder
Setting up your KitchenAid meat grinder attachment correctly is crucial for a smooth And Efficient grinding experience. Begin by assembling the attachment according to the manufacturer’s instructions, Ensuring all parts are securely attache And In place before use. Place a bowl or tray beneath the grinder to catch the ground meats as it is extrude. When attaching the grinder to your KitchenAid stand mixer, Make sure it is firmly secured And Locked into position to prevent any movement during operation. Before turning on the mixer, Run a small amount of meat through the grinder to ensure everything is set up correctly.
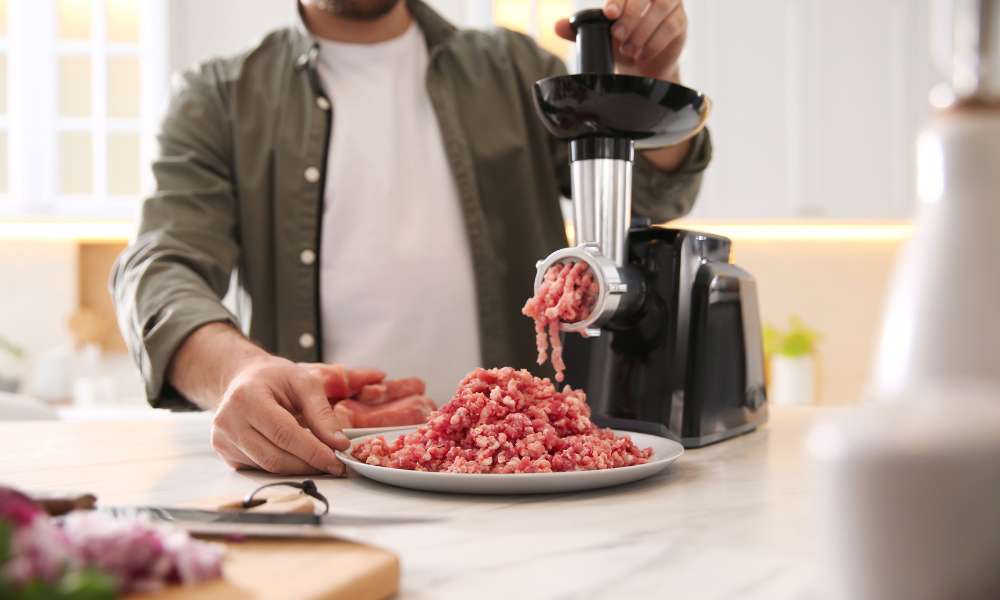
Grinding Process
Once you have prepared the meats And Set up your KitchenAid meat grinder attachment, You are ready to start the grinding process. Start by turning on your stand mixer at a low speed to begin feeding the meats into the grinder chute using either the included stomper or a plunger tool. Use gentle but consistent pressure to push the meats through, Allowing the auger And Blades inside the grinder attachment to work efficiently without causing clogs. Adjusting the speed of your mixer can help control how quickly you grind your meat – higher speeds for faster grinding And Lower speeds for more precision.
Handling Tough Cuts:
When using a KitchenAid meat grinder attachment, It’s important to know how to handle tough cuts of meat to achieve the desired consistency And Texture in your ground meat. Tough cuts like chuck or brisket can benefit from being partially frozen before grinding as this helps maintain a better texture And Prevents the meats from becoming too warm during the process. Make sure to cut these tougher pieces into smaller cubes that fit easily into the grinder chute to facilitate smoother grinding. By handling tough cuts correctly, You can produce evenly ground meats that is perfect for various recipes.
Adding Seasonings Or Mix-Ins:
One of the advantages of using a KitchenAid meat grinder attachment is the ability to customize your ground meat with seasonings or mix-ins according to your taste preferences or specific recipe requirements. Before grinding the meats, Consider mixing in seasonings such as salt, Pepper, Garlic powder, Paprika, or herbs to enhance flavor. You can also add mix-ins like diced onions, Garlic, Jalapeños, Or cheese for added complexity And Texture. Ensure that all seasonings And Mix-ins are well incorporate into the meat mixture before feeding it into the grinder. Experimenting with different combinations can take your ground meats creations to a whole new level of culinary delight.
Cleaning The Attachment
Cleaning the KitchenAid Meat Grinder Attachment is essential for maintaining hygiene And Prolonging its lifespan. After each use, Disassemble the attachment by removing the grinder plate, Cutting blade, And other removable parts. Wash them thoroughly with warm, Soapy water, Ensuring all meat residues are remove. Use a brush to clean hard-to-reach areas. Rinse the parts under running water And Allow them to air dry completely before reassembly. Avoid soaking metal parts to prevent rusting. Regular cleaning after each use ensures your attachment remains in top condition for future use.
Drying And Storing
Once cleaned, Ensure the KitchenAid Mixer Meat Grinder Attachment is completely dry before storing it. Use a clean towel to pat dry all parts, Removing any remaining moisture. Air drying is also recommend to ensure thorough drying. Once dry, Reassemble the attachment And Store it in a cool, Dry place. Avoid storing the attachment while still damp to prevent mold or mildew growth. Proper drying And Storage practices prolong the attachment’s lifespan And Maintain its performance for future meat-grinding tasks. With proper care And Maintenance, Your KitchenAid Meats Grinder Attachment will continue to be a reliable tool in your kitchen arsenal.
Conclusion
Utilizing your KitchenAid meat grinder attachment can elevate your culinary experience by allowing you to control the freshness And Quality of ground meat in your dishes. Understanding each step, From preparing the meats to cleaning And Storing the attachment properly, Ensures not only delicious results but also maintains the longevity of your equipment. By following these guidelines diligently, You can master the art of using your KitchenAid meats grinder attachment with confidence And Ease, Making it a staple tool in your kitchen for years to come.