
Supplanting a bathtub drain can appear to be an overwhelming errand, however, with the right devices and direction, it very well may be a clear interaction. After some time, channels can become eroded, obstructed, or obsolete, requiring a substitution. Whether you’re overhauling your restroom or tending to a pipe issue, knowing how to supplant the bath drain can set aside your time and cash. How To Replace Bathtub Drain Pipe and we’ll give bit-by-bit directions to assist you with effectively eliminating and introducing another channel, guaranteeing your bath works without a hitch, and productively by and by.
1. Gather Tools: Wrench, Pliers, Drain Key.
Before starting the method involved with supplanting the bathtub channel, it’s fundamental to accumulate the important instruments to guarantee a smooth and productive activity. Three essential instruments you’ll require are a wrench, forceps, and a drain key. The wrench will be urgent for relaxing and fixing different parts, like screws and fittings. Pincers will assist with grasping and moving parts that might be difficult or difficult to reach. Ultimately, the drain key is explicitly intended to eliminate the actual channel, giving the important influence to unscrewing it from the bath’s drainpipe. Having these devices promptly accessible will smooth out the cycle and assist you with handling each step with certainty and accuracy.
2. Remove Overflow Cover.
To start the method of supplanting the bathtub channel, the initial step is to eliminate the flood cover. This cover is ordinarily situated on the mass of the bath, over the channel. Utilizing a screwdriver, cautiously unscrew any screws getting the flood cover set up. When the screws are eliminated, delicately pull the cover away from the wall to uncover the flood drain gathering behind it. Be aware of any connected parts, such as the linkage or outing switch, and put them away in a protected area for later reinstallation. Eliminating the flood cover gives admittance to the flood drain parts. Considering further dismantling and possible substitution of the bath channel.
3. Loosen Drain Flange Screws.
After effectively eliminating the flood cover, the subsequent stage in supplanting the bathtub drain is to slacken the drain spine screws. These screws secure the drain rib to the bath’s drainpipe and might be situated under the bath. Utilizing a reasonable wrench or screwdriver, cautiously find and release the screws holding the drain rib set up. Contingent upon the plan of your bath, there might be at least one screw to relax. Take care not to strip or harm the screws during this cycle, as they should be fixed once more at a later time. Slackening the drain spine screws will take into account the expulsion of the old drain. And the establishment of the upgraded one, working with the smooth working of the bath’s waste framework.
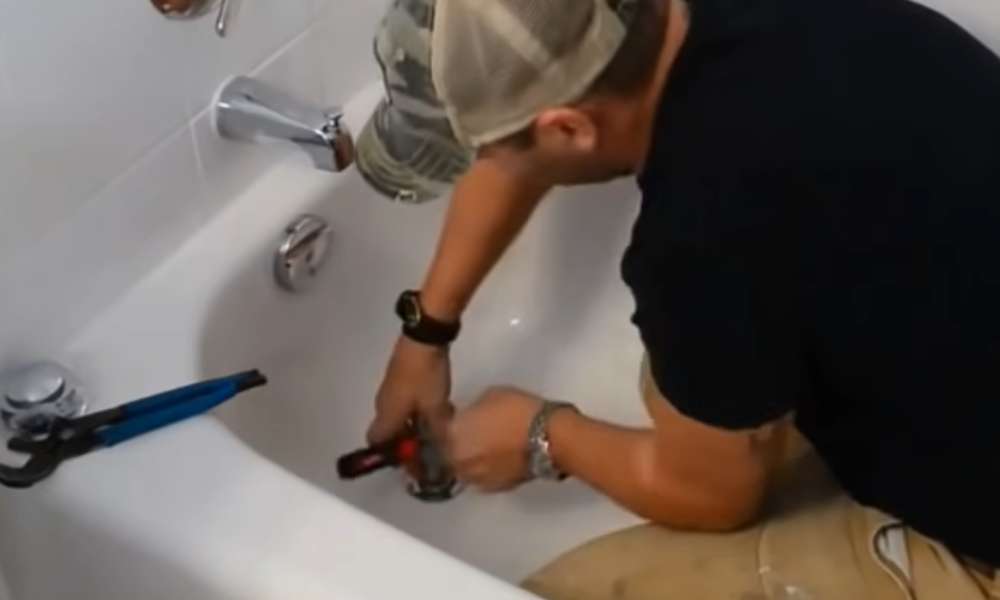
4. Use The Drain Key To Unscrew The Drain.
Once the drain spine screws are released, the following stage in supplanting the bathtub drain includes utilizing a drain key to unscrew the actual channel. The channel key is a specific device intended to squeeze into the line of sight or openings on the channel, giving the fundamental influence to unscrew it from the drainpipe. Embed the drain key into the channel and turn it counterclockwise to release the drain from its situation. Make certain to apply consistent strain and use wariness to abstain from harming the drain or encompassing parts. When the drain is adequately slacken, How To Replace The Bathtub, taking into consideration not to harm the bath’s surface. This step readies the way for the establishment of the new channel, guaranteeing legitimate waste and usefulness of the bath.
5. Clean The Drain Area.
After effectively eliminating the old channel, the following vital stage in supplanting the bath drain is to clean the drain region completely. Utilize a cloth or paper towel to wipe away any garbage, silt. Or buildup that might have collected around the drain opening and the encompassing region. Furthermore, examine the drainpipe for any indications of consumption, development. Or harm, and clean it depending on the situation utilizing a brush or line cleaner. Guaranteeing that the drain region is spotless and liberated from blocks will work with a legitimate seal and smooth establishment of the new channel. Setting aside some margin to clean the drain region completely will assist with forestalling future pipe issues. And guarantee the ideal execution of the bath’s waste framework.
6. Apply The Plumber’s Putty.
Before introducing the new bath channel, it’s fundamental to apply handyman’s clay to make a watertight seal. Handyman’s clay is a flexible fixing compound that stays malleable and adaptable. Making it ideal for fixing around channels and fittings. To apply the handyman’s clay, take a limited quantity and roll it into a rope-like shape. Then, press the clay immovably around the underside of the drain spine, guaranteeing total inclusion. Try to equally circulate the clay to make a uniform seal. This step is critical for keeping water from spilling around the channel and into the encompassing region. When the handyman’s clay is applied, the channel is fit to be introduced safely into the bath, guaranteeing a tight and release-free seal into the indefinite future.
7. Insert New Drain.
With the handyman’s clay applied, the subsequent stage in supplanting the bath channel is to embed the new channel into place. Adjust the new channel to the drainpipe opening in the bath, guaranteeing that it fits cozily and safely. Cautiously lower the channel into position, ensuring that it sits flush against the bath surface. If essential, apply delicate strain to appropriately situate the channel. When the channel is set up, fix any screws or fittings depending on the situation to get it solidly ready. Be mindful not to over-fix, as this could harm the channel or encompassing parts. Introducing the new channel guarantees a legitimate seal and ideal usefulness of the bath’s waste framework, finishing the most common way of supplanting the bath channel.
8. Tighten Screws.
In the wake of embedding the new channel, the ensuing move toward supplanting the bath channel is to safely fix the screws. Use a wrench or screwdriver to fix the screws that protected the channel rib to the bath’s drainpipe. Guarantee that the screws are fixed equally and safely to make a watertight seal. Take care not to overtighten the screws, as this might harm the channel or encompassing parts. Twofold looks at the snugness of the screws to ensure that the new channel is safely affixed and set up. This step is vital for forestalling releases and guaranteeing the drawn-out usefulness of the bath’s waste framework. When the screws are fixed, continue with reassembling any extra parts, for example, the flood cover, to finish the substitution interaction.
9. Reattach Overflow Cover.
When the new bath channel is safely set up, the last move toward the substitution interaction is to reattach the flood cover. Start by adjusting the cover to its comparing position on the bath’s flood channel gathering. Embed any screws or latches and fix them safely utilizing a screwdriver. Guarantee that the cover sits flush against the bath surface and that all parts are appropriately adjusted. Furthermore, on the off chance that there are any linkage or excursion switch systems related to the flood cover. Reattach them as indicated by the maker’s directions. Reattaching the flood cover finishes the substitution of the bath channel, giving a completed look while guaranteeing the legitimate working of the bath’s waste framework. When the cover is safely set up, play out a last check to affirm that all parts are appropriately introduced and fixed, prepared for use.
10. Test For Leaks.
After completing the replacement of the bathtub drain and reattaching the overflow cover. It’s essential to test for leaks to ensure the integrity of the installation. Begin by slowly filling the bathtub with water, and paying close attention to the drain area and surrounding fixtures. Observe for any signs of water leakage or drips, particularly around the newly installed drain and overflow cover. If any leaks are detected, promptly tighten any loose fittings or screws and reapply the plumber’s putty as needed to create a watertight seal. Once the bathtub is filled with water, let it sit for several minutes to inspect for any potential leaks thoroughly.
Additionally, check the area underneath the bathtub for any signs of water accumulation, indicating a leak in the drainpipe. Testing for leaks ensures that the replacement bathtub drain is install correctly and functioning properly. Providing peace of mind and preventing potential water damage in the future.
Conclusion
In conclusion, Supplanting a bath channel is a sensible Do-It-Yourself task that can upgrade the usefulness and presence of your washroom. By following the illustrated advances and using legitimate devices, you can proficiently eliminate the old channel and introduce another one, tending to any pipe concerns and guaranteeing ideal waste. Make sure to take as much time as necessary, be wary, and test for spills before finishing the task. With this newly discovered information, you can certainly handle future pipe projects and partake in a revived bath insight.